Ultralytics#

Ultralytics is a very practical Python library for using or training YOLO models. Their documentation is excellent, but we’ll still show you two YOLO models here. And guess what? This library can also run SAM (Segment Anything Model)!
YOLO#
With all the YOLO models (YOLOv4, YOLOv5, YOLO-NAS, etc.), it’s easy to get lost. My advice? Test them yourself! The authors are different, so it’s hard to say which model is the best.
YOLOv8#
For most YOLO models (except YOLO-World), the way to load the model and perform inference is the same. On the YOLOv8 documentation page, you will see that several models are available.
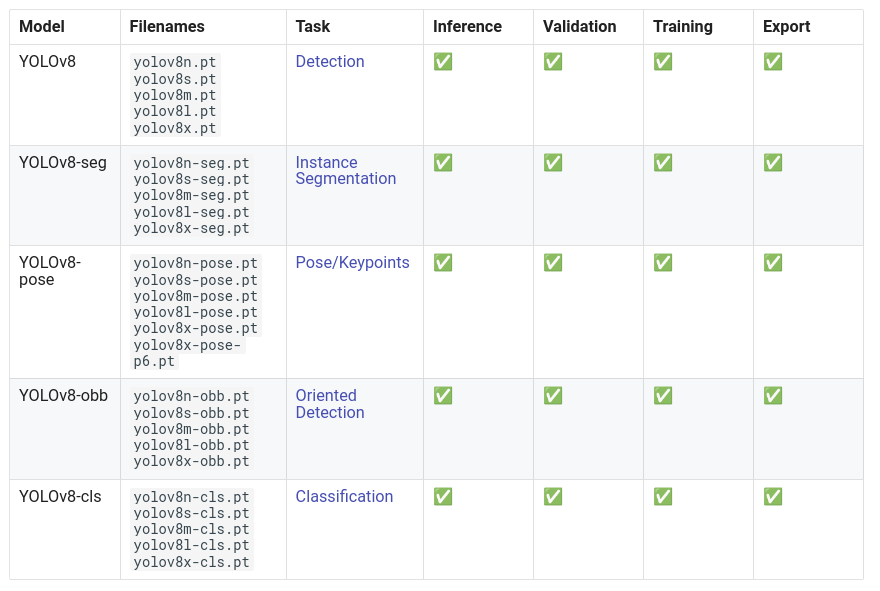
YOLOv8 is not just about detection! It can also perform:
Pose estimation (position of a person in the image, their skeleton)
Oriented detection (bounding boxes can be oriented)
In this notebook, we will focus on a detection example.
To get started, you need to download a model. The choice depends on your resources and the speed you want. The larger the model, the more performant it is, but the slower it is.
Let’s take the fastest model, yolov8n. Here’s how to load it with the Ultralytics library:
from ultralytics import YOLO
import cv2
import matplotlib.pyplot as plt

# On charge le modèle pre-entrainé YOLOv8n
model = YOLO("yolov8n.pt")

# Affiche les informations du modèle
model.info()

# On fait une prédiction sur une image
results = model("images/coco.jpg")
YOLOv8n summary: 225 layers, 3157200 parameters, 0 gradients, 8.9 GFLOPs

image 1/1 /Users/simonthomine/Documents/CoursDeepLearning/08_WIP_DetectionEtYolo/images/coco.jpg: 448x640 6 persons, 2 cars, 1 backpack, 3 handbags, 5 cell phones, 79.1ms
Speed: 1.1ms preprocess, 79.1ms inference, 0.7ms postprocess per image at shape (1, 3, 448, 640)
# Seuil de détection
threshold=0.5
# Les noms des classes
names={0: 'person', 1: 'bicycle', 2: 'car', 3: 'motorcycle', 4: 'airplane', 5: 'bus', 6: 'train', 7: 'truck', 8: 'boat', 9: 'traffic light', 10: 'fire hydrant', 11: 'stop sign', 12: 'parking meter', 13: 'bench', 14: 'bird', 15: 'cat', 16: 'dog', 17: 'horse', 18: 'sheep', 19: 'cow', 20: 'elephant', 21: 'bear', 22: 'zebra', 23: 'giraffe', 24: 'backpack', 25: 'umbrella', 26: 'handbag', 27: 'tie', 28: 'suitcase', 29: 'frisbee', 30: 'skis', 31: 'snowboard', 32: 'sports ball', 33: 'kite', 34: 'baseball bat', 35: 'baseball glove', 36: 'skateboard', 37: 'surfboard', 38: 'tennis racket', 39: 'bottle', 40: 'wine glass', 41: 'cup', 42: 'fork', 43: 'knife', 44: 'spoon', 45: 'bowl', 46: 'banana', 47: 'apple', 48: 'sandwich', 49: 'orange', 50: 'broccoli', 51: 'carrot', 52: 'hot dog', 53: 'pizza', 54: 'donut', 55: 'cake', 56: 'chair', 57: 'couch', 58: 'potted plant', 59: 'bed', 60: 'dining table', 61: 'toilet', 62: 'tv', 63: 'laptop', 64: 'mouse', 65: 'remote', 66: 'keyboard', 67: 'cell phone', 68: 'microwave', 69: 'oven', 70: 'toaster', 71: 'sink', 72: 'refrigerator', 73: 'book', 74: 'clock', 75: 'vase', 76: 'scissors', 77: 'teddy bear', 78: 'hair drier', 79: 'toothbrush'}
image=cv2.imread("images/coco.jpg")
boxes = results[0].boxes.xyxy.cpu().numpy()
confidences=results[0].boxes.conf.cpu().numpy()
labels=results[0].boxes.cls.cpu().numpy()
# Affichage des résultats
for box,conf,label in zip(boxes,confidences,labels):
    box = box.astype(int)
    if conf>threshold:
        x1, y1, x2, y2 = box[:4]
        cv2.rectangle(image, (x1, y1), (x2, y2), (0, 0, 255), 1)
        cv2.putText(image, names[label]+str(conf)[:4], (x1, y1 - 10), cv2.FONT_HERSHEY_SIMPLEX, 1, (0, 255, 0), 2)
#Conversion de l'image en RGB
image=cv2.cvtColor(image, cv2.COLOR_BGR2RGB)
plt.imshow(image)
plt.axis('off')
plt.show()
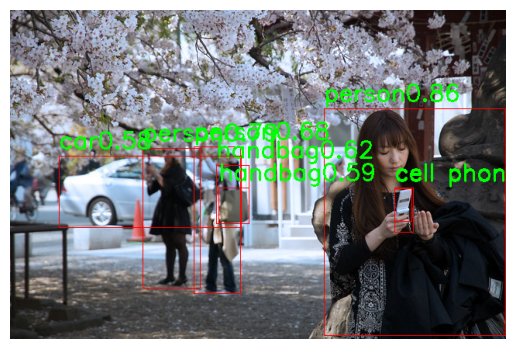
In just a few lines of code, we were able to use the YOLOv8 model!
YOLO-World#
YOLO-World is the new version of YOLO that performs open-vocabulary detection. Older versions are trained on specific classes (usually the 80 classes of COCO), so they need to be retrained or fine-tuned for other classes. YOLO-World, on the other hand, can detect any class. You just need to provide a text prompt along with the input image.
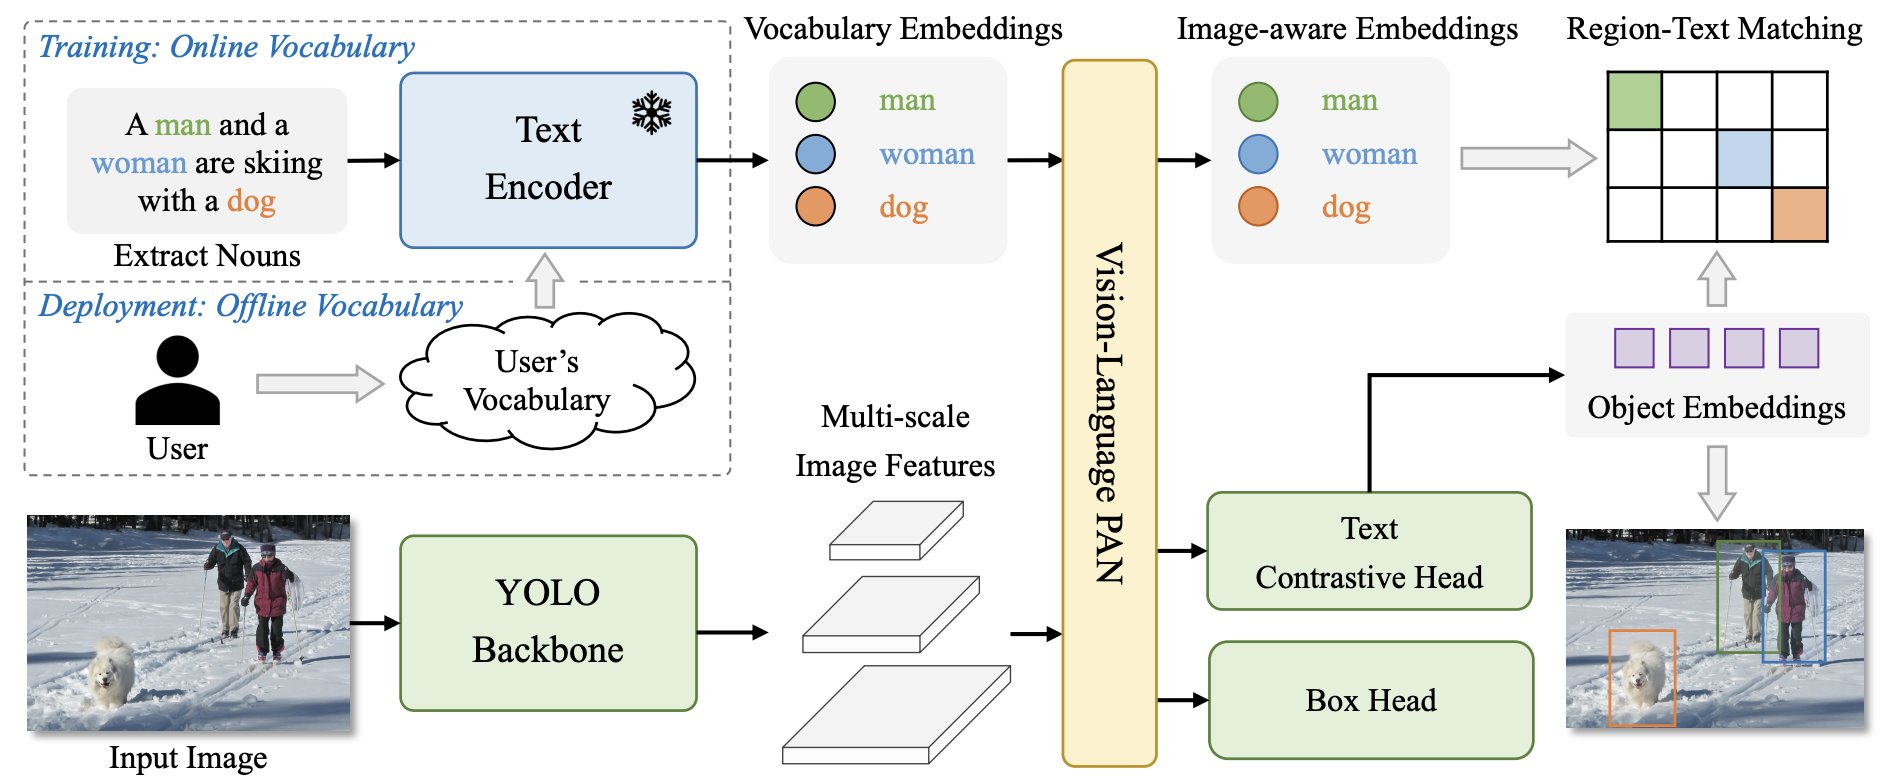
To use it, it’s almost the same as with another YOLO model, except that you need to add a text prompt.
# On charge le modèle pre-entrainé YOLOv8s-world
model = YOLO("yolov8s-worldv2.pt")
# On définit les classes du modèle
model.set_classes(["person", "surfboard"])
names={0: 'person', 1: 'surfboard'}
# On fait une prédiction sur notre image
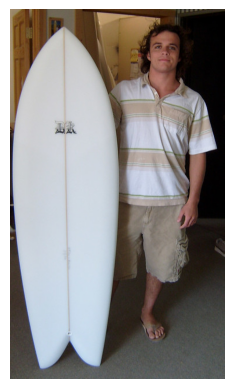
results = model.predict("images/coco2.jpg")
image 1/1 /Users/simonthomine/Documents/CoursDeepLearning/08_WIP_DetectionEtYolo/images/coco2.jpg: 640x384 2 persons, 1 surfboard, 155.2ms
Speed: 2.6ms preprocess, 155.2ms inference, 5.1ms postprocess per image at shape (1, 3, 640, 384)
# Seuil de détection
threshold=0.5
# Les noms des classes
image=cv2.imread("images/coco2.jpg")
boxes = results[0].boxes.xyxy.cpu().numpy()
confidences=results[0].boxes.conf.cpu().numpy()
labels=results[0].boxes.cls.cpu().numpy()
# Affichage des résultats
for box,conf,label in zip(boxes,confidences,labels):
    box = box.astype(int)
    if conf>threshold:
        x1, y1, x2, y2 = box[:4]
        cv2.rectangle(image, (x1, y1), (x2, y2), (0, 0, 255), 1)
        cv2.putText(image, names[label]+str(conf)[:4], (x1, y1 - 10), cv2.FONT_HERSHEY_SIMPLEX, 1, (0, 255, 0), 2)
image=cv2.cvtColor(image, cv2.COLOR_BGR2RGB)
plt.imshow(image)
plt.axis('off')
plt.show()
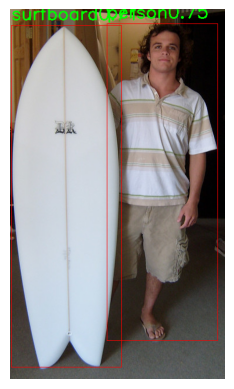
We successfully detect the person and the surfboard.
Segment Anything (SAM)#
SAM is a segmentation model that allows you to segment any object. We’ve already used it in Course 6 on HuggingFace. You can also use it via the Ultralytics library. The choice is yours!
Here’s how to use it with Ultralytics in Python:
from PIL import Image
raw_image = Image.open("images/coco2.jpg")
plt.imshow(raw_image)
plt.axis('off')
plt.show()
We use FastSAM, a faster version of SAM. You can download the weights from this link.
from ultralytics import FastSAM

resized_image=raw_image.resize((1024,1024))
model = FastSAM('./FastSAM-s.pt')
results = model(resized_image,retina_masks=True)
0: 640x640 30 objects, 292.8ms
Speed: 4.2ms preprocess, 292.8ms inference, 199.2ms postprocess per image at shape (1, 3, 640, 640)
import numpy as np

def draw_masks(image,masks):
    image_np = np.array(image)
    plt.cm.get_cmap('tab20', 38)
    colors = plt.cm.get_cmap('tab20', 38)
    for i, mask in enumerate(masks):
        color = colors(i)[:3]
        color = tuple(int(c * 255) for c in color)
        mask =mask.data.squeeze().numpy()>0.5
        image_np[mask] = image_np[mask] * 0.5 + np.array(color) * 0.5
    return image_np

image_np = draw_masks(resized_image,results[0].masks)
plt.imshow(image_np)
plt.axis('off')
plt.show()
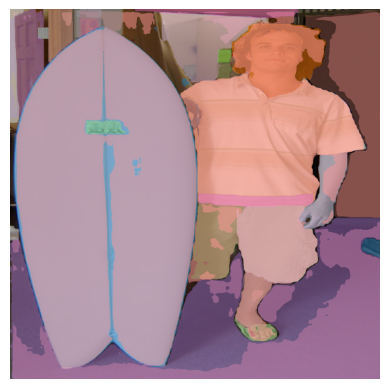
The results are average, but it’s the smallest model of FastSAM, and it’s very fast (you can compare it to the processing time of Notebook 2 from Course 6 on Hugging Face).
Note: You can also make prompts with points, boxes, or text (see the documentation for more details).
You now know how to use fast image detection and segmentation models with the Ultralytics library!