Long Short-Term Memory#
In the previous notebook, we introduced the classic RNN layer. Since its invention, many other recurrent layers have been created.
Here, we will explore the LSTM (long short-term memory) layer, an alternative to the classic RNN layer.
What is an LSTM Layer?#
The LSTM layer consists of a memory unit with 4 fully connected layers. Three of these layers are used to select relevant information from previous steps: the forget gate, the input gate, and the output gate.
Forget gate: Removes information from memory
Input gate: Inserts information into memory
Output gate: Uses stored information
The last fully connected layer generates a “candidate information” for the LSTM layer’s memory.
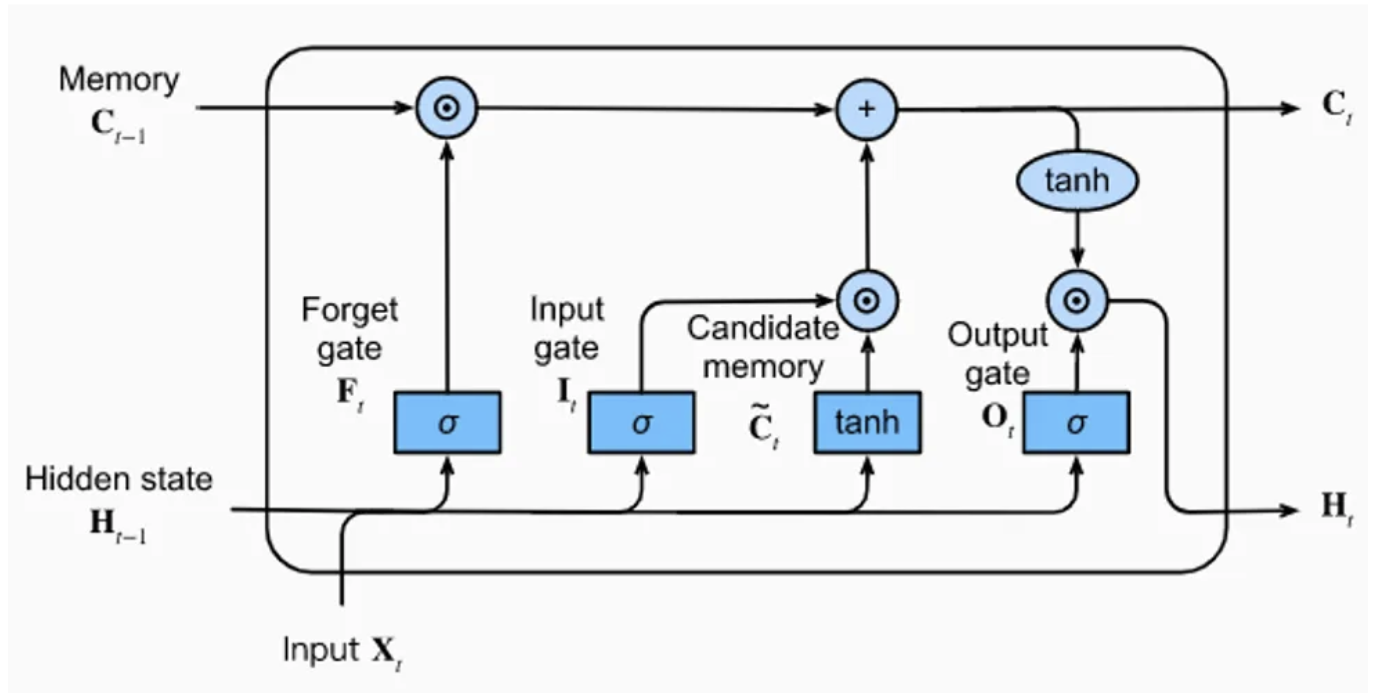
Figure from the blog post.
As shown in the figure, the LSTM layer receives 3 input vectors: \(H_{t-1}\), \(C_{t-1}\), and \(X_{t}\). The first two come directly from the LSTM, and the third corresponds to the input at time \(t\) (the character in our case).
Simplified: \(H_{t-1}\) contains short-term memory, and \(C_{t-1}\) contains long-term memory. This allows retaining important information over a broad context without neglecting local context.
The idea is to solve the problem of information propagation over long sequences that occurs in classic RNNs.
For further exploration, you can read the article or check out the blog post.
PyTorch Implementation#
import torch
import torch.nn as nn
Dataset#
To create the dataset, we still use the moliere.txt file and reuse the code from the previous notebook.
with open('moliere.txt', 'r', encoding='utf-8') as f:
    text = f.read()
print("Nombre de caractères dans le dataset : ", len(text))
Nombre de caractères dans le dataset : 1687290
We reduce the number of elements for faster training (uncomment if you want to train on all data).
text=text[:100000]
print("Nombre de caractères dans le dataset : ", len(text))
Nombre de caractères dans le dataset : 100000
chars = sorted(list(set(text)))
vocab_size = len(chars)
print(''.join(chars))
print("Nombre de caractères différents : ", vocab_size)
 !'(),-.:;?ABCDEFGHIJLMNOPQRSTUVYabcdefghijlmnopqrstuvxyz«»ÇÈÉÊàâæçèéêîïôùû
Nombre de caractères différents :  76
stoi = { ch:i for i,ch in enumerate(chars) }
itos = { i:ch for i,ch in enumerate(chars) }
encode = lambda s: [stoi[c] for c in s] # encode : prend un string et output une liste d'entiers
decode = lambda l: ''.join([itos[i] for i in l]) # decode: prend une liste d'entiers et output un string

data = torch.tensor(encode(text), dtype=torch.long)
Split into training and test sets.
n = int(0.9*len(data)) # 90% pour le train et 10% pour le test
train_data = data[:n]
test = data[n:]
Model Creation#
To create the model, we directly use PyTorch’s implementation of the LSTM layer. Unlike linear or convolutional layers, nn.LSTM allows stacking multiple layers with the num_layers parameter. If you want to define them one by one, you need to use nn.LSTMCell.
class lstm(nn.Module):
    def __init__(self, vocab_size, hidden_size,num_layers=1):
        super(lstm, self).__init__()
        self.hidden_size = hidden_size
        # On utilise un embedding pour transformer les entiers(caractères) en vecteurs
        self.embedding = nn.Embedding(vocab_size, hidden_size)
        # La couche LSTM peut prendre l'argument num_layers pour empiler plusieurs couches LSTM
        self.lstm = nn.LSTM(hidden_size, hidden_size, num_layers=num_layers)
        # Une dernière couche linéaire pour prédire le prochain caractère
        self.fc = nn.Linear(hidden_size, vocab_size)

    def forward(self, x, hidden):
        x = self.embedding(x)
        x, hidden = self.lstm(x, hidden)
        x = self.fc(x)
        return x, (hidden[0].detach(), hidden[1].detach())

    def init_hidden(self, batch_size):
        return (torch.zeros(1, batch_size, self.hidden_size), torch.zeros(1, batch_size, self.hidden_size))
Training#
epochs = 20
lr=0.001
hidden_dim=128
seq_len=100
num_layers=1
model=lstm(vocab_size,hidden_dim,num_layers)
criterion = torch.nn.CrossEntropyLoss()
optimizer = torch.optim.AdamW(model.parameters(), lr=lr)
The LSTM layer takes a sequence as input and returns a sequence of the same size. This speeds up training as we can process multiple examples at once.
Note: Training can also be accelerated by batch processing with multiple sequences in parallel.
for epoch in range(epochs):
    state=None
    running_loss = 0
    n=0
    data_ptr = torch.randint(100,(1,1)).item()
    # On train sur des séquences de seq_len caractères et on break si on dépasse la taille du dataset
    while True:
        x = train_data[data_ptr : data_ptr+seq_len]
        y = train_data[data_ptr+1 : data_ptr+seq_len+1]
        optimizer.zero_grad()
        y_pred,state = model.forward(x,state)
        loss = criterion(y_pred, y)
        running_loss += loss.item()
        n+=1
        loss.backward()
        optimizer.step()
        data_ptr+=seq_len
        # Pour éviter de sortir de l'index du dataset
        if data_ptr + seq_len + 1 > len(train_data):
            break
    print("Epoch: {0} \t Loss: {1:.8f}".format(epoch, running_loss/n))
Epoch: 0 	 Loss: 2.17804336
Epoch: 1 	 Loss: 1.76270216
Epoch: 2 	 Loss: 1.62740668
Epoch: 3 	 Loss: 1.54147145
Epoch: 4 	 Loss: 1.47995140
Epoch: 5 	 Loss: 1.43100239
Epoch: 6 	 Loss: 1.39074463
Epoch: 7 	 Loss: 1.35526441
Epoch: 8 	 Loss: 1.32519794
Epoch: 9 	 Loss: 1.29712536
Epoch: 10 	 Loss: 1.27268774
Epoch: 11 	 Loss: 1.24876227
Epoch: 12 	 Loss: 1.22720749
Epoch: 13 	 Loss: 1.20663312
Epoch: 14 	 Loss: 1.18768359
Epoch: 15 	 Loss: 1.16936996
Epoch: 16 	 Loss: 1.15179397
Epoch: 17 	 Loss: 1.13514291
Epoch: 18 	 Loss: 1.11997525
Epoch: 19 	 Loss: 1.10359089
We can now evaluate the loss on the test data.
state=None
running_loss = 0
n=0
data_ptr = torch.randint(100,(1,1)).item()
while True:
    with torch.no_grad():
        x = test[data_ptr : data_ptr+seq_len]
        y = test[data_ptr+1 : data_ptr+seq_len+1]
        y_pred,state = model.forward(x,state)
        loss = criterion(y_pred, y)
    running_loss += loss.item()
    n+=1
    data_ptr+=seq_len
    if data_ptr + seq_len + 1 > len(test):
        break
print("Loss de test: {0:.8f}".format(running_loss/n))
Loss de test: 1.51168611
The model overfits quite a bit… Try fixing this on your own.
Generation#
Now we can test text generation!
import torch.nn.functional as F
moliere='.'
sequence_length=250
state=None
for i in range(sequence_length):
    x = torch.tensor(encode(moliere[-1]), dtype=torch.long).squeeze()
    y_pred,state = model.forward(x.unsqueeze(0),state)
    probs=F.softmax(torch.squeeze(y_pred), dim=0)
    sample=torch.multinomial(probs, 1)
    moliere+=itos[sample.item()]
print(moliere)
.
Çà coeuse, et bon enfin l'avoir faire.

MASCARILLE.

En me donner d vous, Le pas.

MASCARILLE, à dans un pour sûte matinix! cette ma foi.

PANDOLFE.

Ma foi, tu te le sy sois touves d'arrête sa bien sans les bonheur.

MASCARILLE.

Moi, je me suis to
Generation is a bit better than the basic RNN model, but not yet convincing. You can try improving performance by modifying parameters (number of stacked layers, hidden dimension, etc.).